Description and Function
(Image of LP and other bodywires)
These notes relate to foil, epee and sabre.
Bodywires connect the fencer’s weapon to the spool cable and then to the scoring box.
The bodywire connects to the IGS (Inside Guard Socket) of the weapon, with either a bayonet or two pin plug, then travels up the arm, through the armpit of the jacket and drops out the back at the bottom of the jacket where a three pin plug connects it to the scoring system.
If it is a wireless system it plugs into a transmitter box that usually fits into the fencer’s back pocket. If it is a traditional ‘spool’ system it fits into the ‘fencer end’ socket of the spool cable. This is attached to the fencer’s jacket with a ‘dog clip’.
For foil and sabre there is also a wire with a crocodile clip that attaches to the fencer’s metal threaded jacket, the lamé.
The mechanical / electrical aspects of the scoring systems can be found elsewhere.
The bodywire gets a lot of abuse when in use by being folded or jammed into kit bags, pulling on the cables (don’t do that!) and exposure to perspiration (it goes through the armpit..), which turns transparent insulation yellow and brittle and manages to seep in to rot the wires. Lovely!
Poor connections and broken wires cause the dreaded white light problem in foil, hits not registering in sabre and epee and is probably the third most frequent repair to fencing kit carried out by armourers.
It is perfectly possible for fencers and parents to check and carry out some basic repairs to some brands of bodywires. Others are more fiddly while the crocodile clip is considered an Expert Repair as it requires heavy soldering equipment and related skills.
To identify wire breaks, especially in non-transparent wires, usually requires the use of a multimeter (see Advanced Tools) and is considered an Advanced repair method.
Epee bodywires have a three pin plug at both ends of the wire.
Sabres and foils use bayonet style plugs and IGSs (Inside Guard Socket) but these are being replaced by the two pin type.
Sabres are connected differently to the foil in that both wires are connected to the sabre guard via the socket bracket to make the whole weapon into an electrical ‘wand’.
Foils send the current up the wire and back through the blade. See Foil Modules. Epees send it up one wire and back through a second one. Foils and epees are wired so that hits on the blade and guard are not registered.
Tools and Materials
- 2mm Flat Screwdriver
- 5mm screwdriver – for 2 pin plugs
- 2mm, crosshead screwdriver -for some brands of 2 pin plugs
- Small pliers with narrow noses
- Wire stripper or sharp DIY knife, preferably with retractable blade
- Wooden block or cutting mat
- Fine grade emery paper – only for bayonet plugs
- Protective work gloves are recommended (see tools and materials module)
- Score box or Multimeter for testing (see under Advanced methods)
Leon Paul brand
Fencer End Three Pin Plug
image: of disassembled plug showing wire strain route
The three pins are held together by a hard plastic bridge inside a soft plastic cover, or ‘boot’ in electrical terms
Ease the pins out from one end of the boot, It requires strong fingers or pliers.
Try not to bend the plastic bridge as it may break. This weakens the contact in the socket (and is 30% the cost of the bodywire!)
The bridge also provides ‘strain relief’ to minimise damage from pulling on the wires, which should be avoided
Each wire is secured by a screw in the base of the pin. The opposite end of the screw is a sharp point that penetrates the wire insulation to make the contact.
The screws work loose over time and a simple tweak with a screwdriver will tighten them. If you feel some movement then it is probably fixed.
If the wire is transparent you can examine it for breaks. These are often seen as a black spot inside the insulation. If you gently pull the wire it will look like the wire is stretching at that spot, a sure sign of a break
(If the wire is not transparent then a multimeter will be required to find any breaks. This is an Advanced method)
Before cutting, mark the wire that goes to the middle pin to ensure you re-connect to the correct pins eg with a felt pen
Cut the wire behind the black spot and reconnect by pushing the insulated wire through the pin and tightening the screw firmly to pierce the insulation.
DO NOT strip the insulation from the wire
DO NOT overtighten the screw. If you break the slot you will need a pair of small pliers to remove it. If you are lucky. Spares are available from Leon Paul and Armourers.
Ensure the wires are pushed into the strain relief grips of the bridge
Note – The third wire is usually separate from the other two. This leads to the lamé crocodile clip and can be treated independently from the other two. It does not cause white lights for the fencer. It may for their opponent!
Ease the bridge back into the boot. Ensure it goes in to match the cutouts in the boot for a good fit
If the ‘tail’ of the boot is split, wrap some blade tape around it to support the wire and reduce the risk of future wire breaks or replace.
If you use a bright coloured tape it is easy to write your initials or name on it in case you mislay it at an event or lend it to someone else.
Two Pin Plug
Image: both types of two pin, disassembled and labelled. Reattaching a screw type pushpin (or drawing)
The new Leon Paul two pin plug is an excellent design. It is held together by one screw which requires the 5mm screwdriver
With older two pin plugs you will also need to disassemble the plug retaining clip which is held by a micro-sized retaining screw (often a small cross head) in the end of a press-pin. It is sprung so hold the press-pin in place or it will fly apart.
If you need a replacement spring use epee point pressure springs
You will notice one pin is fat and one thin. They only fit into the case one way. Before removing wires ensure you mark the one that attaches to the skinny pin with a sharpie or felt pen so that you re-connect them correctly.
The wires are retained in the pins by two screws. Check that these are tight.
If the wire is transparent you can examine it for breaks. These are often seen as a black spot inside the insulation. If you gently pull the wire it will look like the wire is stretching at that spot, a sure sign of a break
If the wire is not transparent then a multimeter will be required to find any breaks. This is an Advanced skill
When you reconnect after cutting the wire, the wire must be stripped of insulation by 3mm. If you do not have a wire stripper, carefully press a cutting blade into the insulation (on a wooden block or cutting mat) rather than cutting across the wires, to avoid breaking the strands. Twist the strands, insert in the base of the pin and tighten the screws. Firmly.
During reassembly, the easiest way is to insert the press-pin, (with spring) only part way and held with a finger.
Insert the small retainng screw into the clip, lower it into the hole on the opposite side and hold in place with a thumb. Press the two together while turning the screw. The screw will engage into the end of the press-pin and draw the two together as you tighten.
If your finger or thumb slips be prepared for a game of hunt the pieces!
Bayonet Plug
Image: of bayonet plug disassembled
If it is not a two pin plug then it is probably a bayonet type. These have a long, finger shaped plastic ‘boot’
Note – These have been withdrawn from sale. The two pin type is now the global standard.
There are many bayonet plugs and sockets still in use and will remain so for some time.
For some competitions the two pin type is required. It is quite straightforward to change them over, but you must also change the IGS on the weapon and that needs to be done with care. See the Advanced Foil Maintenance page.
To check the bayonet wire connections, hold the metal contact with fingers or pliers and slide off the boot.
The wires are retained in the same way as the fencer end 3 pin plug, with pointed pins. Tighten each one to ensure good contact through the insulation
On transparent wires check for and fix breaks in the same way as for the fencer end plug including marking the wires to ensure they are re-attached correctly.
Use emery paper to clean the screw in the end of the contact. A tarnished screw is another cause of poor contact.
Ensure the contact screw is tight.
Ensure the other screw is tight as this holds the plug together as well as being part of the electrical circuit.
Push the boot back on. Try not to pull the wires as you do so
Finally – Test!
The only way to test properly (without a multimeter) is with a score box when back on the piste, but at your club, not a competition as you may get a red card and give a point to the opponent!
If you have access to a multimeter (see Advanced Tools) it must register two ohms or less and should really be less than one ohm.
If it is still faulty or has a resistance over 2 ohms then pass it to an Armourer for further investigation
Other brands
Three Pin Plugs
The main difference from the Leon Paul is that the three pin fencer end plug is held together by two or more screws. Do not lose the nuts. They will fall out when the screws are removed!
If the wire is transparent you can examine it for breaks. These are often seen as a dark splodge inside the insulation. If you gently pull the wire it will look like the wire is stretching at that point, a sure sign of a break
If the wire is not transparent then a gentle pull may reveal the site of a break where it stretches. Otherwise a multimeter will be required to find any breaks. This is an Advanced skill
Cut wires must have the insulation stripped back by 3mm, and the wire strands twisted before tightening the screws
On some brands the wire can be stripped by 6mm, twisted and folded back to make a loop to get a better grip from the screw, IF the hole in the pin is large enough
The screws are in a rectangular section of the connection pin. They only fit into the case screw side up, or down, and occasionally sideways! Make a note of the orientation as you disassemble.
For two pin plugs follow the Leon Paul instructions.
There are other brands of bayonet plug and socket, such as the Italian, but these are only seen at international competitions and are also being replaced by the two pin type
Additional two and three pin plug Issues
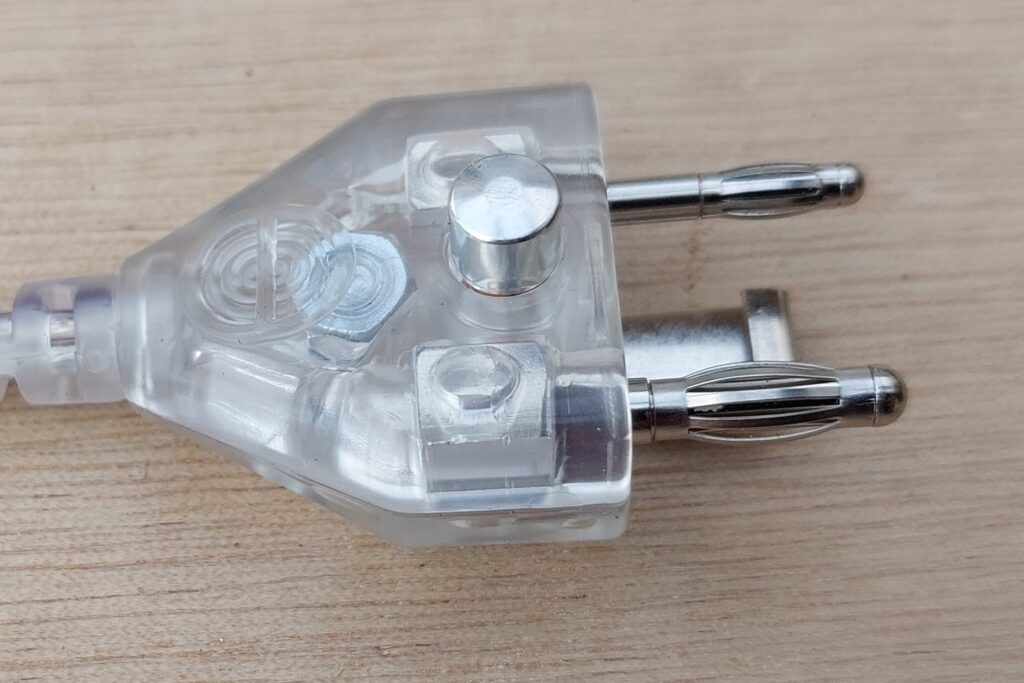
Pic of cage type ‘banana’ plugs
On the two pin and some three pin plugs (not Leon Paul) the connection pins consist of a spring ‘cage’ rotating on a central pin known as a ‘banana plug’. This springing helps make a good contact with the inside of the socket. However, over time, the springiness is lost and connection reliability is affected.
Carefully insert a small screwdriver into the spring bands and twist to bend them and improve the contact. It is only a short term solution as, if done repeatedly, the bands will eventually break.
Where the spring cage rotates on an inner shaft, the constant rotation can wear away the plating and lead to a poor connection and white lights or missed hits.
In both cases you will need to replace the plug or entire bodywire as this is unrepairable.